
This is a basic tutorial to help you achieve an adorable, durable, and frugal doll face for you or some blessed other. I am no expert and did this with a very basic knowledge. If I can do it, you can too!
As you can see on my pictures, I often completed one side before moving on to the other. I did this to make sure I liked the method I was choosing before leading anyone else to do so. For facial patterns and instructions, check out one of my free doll patterns:


Materials:
Embroidery needles
Scissors
5" Embroidery Hoop
Embroidery Thread Colors:
Black for the pupil
3-4 colors for the Iris
White for the Sclera
1 color matching your chosen hair color
2 colors for you lips, 1 light and a darker 1 of the same shade
1 skin tone color for the nose and under the eye
*Note I always worked with 2 strands of thread doubled and knotted on the end. So, 4 threads were in every stitch. I hope that's not confusing. If it is, then I hope the pictures will help.
I will lead you through the steps as I did them.
The Iris and Pupil:
These are similar to the type of stitch I used:


However, I modified it by not stitching very much in the back (pic 3). I had to do this because the amount of thread in that small area was dense enough to make it difficult to embroider otherwise. (Please just look at the eye on your right. The other was my test eye.)

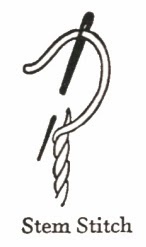
Outline the Iris with your darkest eye color using a stem stitch.


Using a satin stitch fill in the black pupil.

Using your middle color do a short ray around the pupil.

The eyebrow:
I used the stem stitch again.

The bottom of the eye and eyelashes:
Use a split stitch for the bottom of the eye.

And another stem stitch for the eyelash out line.
Use a straight stitch for the 3 long eylashes, tacking them down with a small stitch slightly below where it would otherwise lie. This creates a subtle curve. This is an exaggeration of the basic idea:


The nose and mouth:
Use a split stitch for the nose

and a satin stitch for the mouth.


I was intimidated about embroidery before I just did it. There are plenty of great tutorials on You Tube with these stitches if you need them. I recommend giving it a try. If you mess up, it's easy to fix or start over.
Who do you know that would love a doll made by you?
I would love to see any photos from your dolls. So, please send me a picture if you can!
Here are my hair tutorials for doll making:


Want some quick gratification and appreciation?
Try my Oreo Cake Recipe:

Here is another free pattern & tutorial for embroidering a doll's face:

Love this sweet little doll face. I made a similiar one many years ago for my daughter, the eyes are just so adorable. Thanks for sharing this tutorial and many of your other ones, although I haven't made a doll in ages, the love of dolls is always with me. I'm addding you to my readers list.
ReplyDeleteThank you Victoria! I am glad that you like it. I am really enjoying making Blythe dolls. For our son I crocheted many animals and for our daughter I have made many dolls. I am so glad she loves them, our son never had any interest in dolls. I never liked dolls myself until I was older. I only liked stuffed animals as a child. Now I love them all and want to make everything! :o) Thanks for adding me to your reader's list. I hope you enjoy my future posts!
DeleteThis is brilliant. The face really makes or breaks it and is so easy to get wrong. I love your super clear step by step instructions. Thank you
ReplyDeleteThank you! I try to make tutorials that are easy for people replicate and I hope that I have achieved it. I am glad you think I did.
DeleteGreat tutorial! I would feel confident I could do this - not near as well as yours though! Off to read how to do doll hair. Thanks for linking up to Follow along Friday!
ReplyDeleteThanks! I bet you would do a fabulous job! It would make me so excited to see someone else give it a try. The hair will be a cinch since you can easily crochet the base cap!
DeleteWhat a great tutorial and darling doll! Thanks so much for sharing!! When you say you didn't stitch much in the back, I am confused. How did you do that? I know how dense stitching can get, so I'd love to understand this. Did you take a tiny stitch in the back to anchor it, then come up to the front and do a line, then do another tiny stitch at the other end of that stitch? I'm sure I'm needlessly complicating something that should easily make sense.
ReplyDeleteI went to the closest point to enter in again for my pattern. I didn't use the traditional satin stitching method on the backside. Look at the bottom pictures in the first 2 collages. They demonstrate what I am saying.
DeleteI love this tutorial. Been thinking of making a doll for my (soon to be 3 year old) granddaughter. Thank you for the instructions, it's very generous of you to share this information. I'll be "following" you, now.
ReplyDeleteThanks Cynthia! Handmade toys are so sweet! If you make her one, please send me a picture. I would love to see her. :o)
DeleteWow! Absolutely gorgeous dolls!
ReplyDeleteThanks Lizzy!
DeleteThis is such a beautiful little face. I can just picture my girls staring into it lovingly
ReplyDeleteSo sweet! Thanks, Malinda!
DeleteHi Charlie,
ReplyDeleteThank you so much for posting these tutorials. I am just about to post about the doll - Izzy - and doll's dress I am making. I have used your tutorial to make a cap, latch her hair, also for embroidering her face. I would have sent you a photo but I haven't seen your email address, so perhaps you would like to look in on my blog: http://TheFlashingScissors.blogspot.co.uk
Thank you again, Barbara xx